DIY: MKIV Jetta turn/cruise stalk replacement
Posted: Jun Wed 15, 2011 2:37 am
Here's a DIY on how to replace the turn/cruise stalk on an MKIV. Symptoms were that the cruise control didn't function, and when scanned with VCDS I was getting code 17977/P1569:
Hardware:
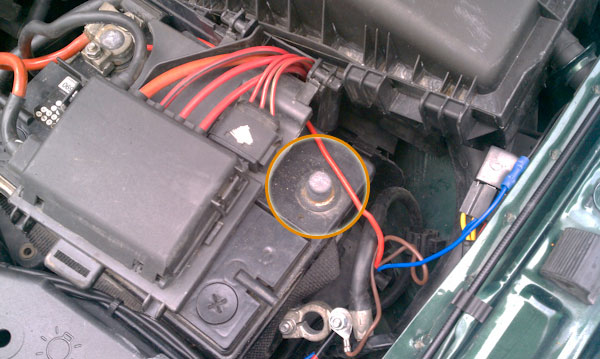
First, disconnect your negative ground cable from the battery and move it to an area where it will not contact the battery terminal. We will be removing the wheel and airbag, so always make sure to remove power and avoid any static or electrical discharge when working with the airbag:
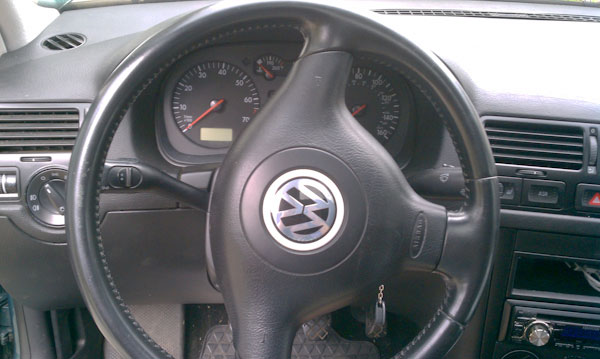
Now, turn your key to the ON position, and with your wheels straight, and turn your steering wheel 90 degrees counter-clockwise:
On the back of the wheel there is a small hole where you need to insert a screwdriver, catch the spring holding the airbag, and push that spring towards the center. It's not tough, but it takes some time and practice. If you need more instructions, please reference the Bentley repair manual or do a Google search.
When done with that side, turn the wheel 180 degrees the opposite direction and repeat the process on the other side.

When you get both sides, the airbag will come out of the wheel. You will see three connectors - #1 can be carefully removed from the terminal it in plugged in to, #2 is a small connector that can also be removed by squeezing the tabs together and pulling out, and #3 is a connector that I consider optional to remove. I have removed it in the past, but it is hard to remove with the wheel on, so I usually leave it on and carefully work around removing the wheel with it connected and the airbag sitting off to the side, being careful not to put any strain on the #3 connector:

Use your 12mm triple square...

Insert the bit and while holding the wheel (or using the ignition lock), turn the socket counter clock-wise and remove the bolt:

Take this time to mark your wheel alignment with a sharpie or other marker or tool:

Set the wheel and bag aside, and you should now see the clock spring and the upper and lower steering column covers:

First remove the upper column by using your #0 Phillips screwdriver to remove the two screws at the arrows and flip the upper cover up out of the way:

Remove the two screws on the front of the lower column cover:

Also remove the T25 screw on the bottom of the lower column cover:

Carefully open the column release lever, and now the lower cover can be moved out of the way:

Remove the clock spring by using your flat head screwdriver to lift up and release the tabs where the arrows are:

Then release the connector (circled) and the last tab on the bottom of the clock spring and the part will pull off of the column:

With the clock spring off, now we can begin to remove the turn/cruise and wiper stalk assembly. Use a 4mm allen to loosen (not remove) the bolt on the column clamp:

Now begin to remove the four (4) connectors on the back of the assembly. Simply pull (in the direction of the arrows) these connectors out, starting with the turn/cruise side:

This connector has a tab that needs to be depressed - it is hidden on the rear of the connector - I used my small flathead screwdriver to depress it, then pull up:

Simply pull out on this connector:

Use your flathead to gently push and release the tab on each end of the connector, and now the entire assembly should slide off of the column:

Separate the two halves by depressing the tab in the middle (circled) and move the two halves in opposite directions:

Swap the new turn/cruise stalk into the assembly, and reassemble everything in reverse.
Install and align the wheel and torque the center bolt to 50 Nm (37 ft-lb). Mark it with a punch or a dot to indicate that it has been removed and re-torqued - there is a max life of 5 times that the bolt can be torqued to spec, and then it needs to be replaced.
Reconnect your airbag connectors, and reinstall the airbag being especially careful not to pinch any wires.
Reconnect the negative terminal on your battery, and test your lights, turn signals, horn and wipers. Go for a test drive and enjoy using your now-functional cruise control!

I was aware that the switch in earlier Jetta's were known to fail, so it was time to order a new switch.17977/P1569/005481 - Cruise Control Switch (E45): Implausible Signal
Possible Causes
* Wiring defective.
* Cruise Control Switch (E45) Faulty.
Hardware:
- New turn/cruise stalk #1J095351301C
- #0 Phillps screwdriver
- 12mm triple square (12 point) bit (1/2 socket preferred)
- T25 Torx screwdriver
- One small flathead screwdriver
- 4mm allen key (ball joint preferred)
- 10mm socket and wrench
First, disconnect your negative ground cable from the battery and move it to an area where it will not contact the battery terminal. We will be removing the wheel and airbag, so always make sure to remove power and avoid any static or electrical discharge when working with the airbag:
Now, turn your key to the ON position, and with your wheels straight, and turn your steering wheel 90 degrees counter-clockwise:
On the back of the wheel there is a small hole where you need to insert a screwdriver, catch the spring holding the airbag, and push that spring towards the center. It's not tough, but it takes some time and practice. If you need more instructions, please reference the Bentley repair manual or do a Google search.
When done with that side, turn the wheel 180 degrees the opposite direction and repeat the process on the other side.
When you get both sides, the airbag will come out of the wheel. You will see three connectors - #1 can be carefully removed from the terminal it in plugged in to, #2 is a small connector that can also be removed by squeezing the tabs together and pulling out, and #3 is a connector that I consider optional to remove. I have removed it in the past, but it is hard to remove with the wheel on, so I usually leave it on and carefully work around removing the wheel with it connected and the airbag sitting off to the side, being careful not to put any strain on the #3 connector:
Use your 12mm triple square...
Insert the bit and while holding the wheel (or using the ignition lock), turn the socket counter clock-wise and remove the bolt:
Take this time to mark your wheel alignment with a sharpie or other marker or tool:
Set the wheel and bag aside, and you should now see the clock spring and the upper and lower steering column covers:
First remove the upper column by using your #0 Phillips screwdriver to remove the two screws at the arrows and flip the upper cover up out of the way:
Remove the two screws on the front of the lower column cover:
Also remove the T25 screw on the bottom of the lower column cover:
Carefully open the column release lever, and now the lower cover can be moved out of the way:
Remove the clock spring by using your flat head screwdriver to lift up and release the tabs where the arrows are:
Then release the connector (circled) and the last tab on the bottom of the clock spring and the part will pull off of the column:
With the clock spring off, now we can begin to remove the turn/cruise and wiper stalk assembly. Use a 4mm allen to loosen (not remove) the bolt on the column clamp:
Now begin to remove the four (4) connectors on the back of the assembly. Simply pull (in the direction of the arrows) these connectors out, starting with the turn/cruise side:
This connector has a tab that needs to be depressed - it is hidden on the rear of the connector - I used my small flathead screwdriver to depress it, then pull up:
Simply pull out on this connector:
Use your flathead to gently push and release the tab on each end of the connector, and now the entire assembly should slide off of the column:
Separate the two halves by depressing the tab in the middle (circled) and move the two halves in opposite directions:
Swap the new turn/cruise stalk into the assembly, and reassemble everything in reverse.
Install and align the wheel and torque the center bolt to 50 Nm (37 ft-lb). Mark it with a punch or a dot to indicate that it has been removed and re-torqued - there is a max life of 5 times that the bolt can be torqued to spec, and then it needs to be replaced.
Reconnect your airbag connectors, and reinstall the airbag being especially careful not to pinch any wires.
Reconnect the negative terminal on your battery, and test your lights, turn signals, horn and wipers. Go for a test drive and enjoy using your now-functional cruise control!