2003 Audi Atlas A4 Avant - Build thread
Moderators: Mikewire, Rennwagen1
-
BigSkyGLI

- Fukengrüven!

- Posts: 367
- Joined: Mar Thu 16, 2006 11:40 am
- Vehicles: '89 GTI~'90 GLI~'08 Passat~'12 Golf
- Location: Live Free or Die
Re: Audi Atlas A4 Avant
Ah so that is what those pesky control arms look like. I think we ended up having all of them replaced on our old B5 Audi Avant. :/
Unaffiliated.
-
Mikewire

- Site Admin

- Posts: 4090
- Joined: Oct Thu 20, 2005 1:23 am
- Vehicles: Air and Water
- Location: San Antonio, TX
- Contact:
Re: Audi Atlas A4 Avant
For reference - torque specs on the control arms:
Upper front; 50 Nm + 1/4 turn into mounting bracket
Upper rear; 50Nm + 1/4 turn into mounting bracket
Upper pinch bolt; 40 Nm (not TRE pinch bolt)
Lower front; 80 Nm + 1/4 turn into subframe
Lower rear; 90 Nm +1/4 turn into subframe
Lower control arms into steering knuckle; 100 Nm
Mounting bracket (shock tower assembly)
Upper bolts from inside the engine bay; 75 Nm
Lower nut and bolt into control arm; 90 Nm
Sway bar end link;
Lower connection to the sway bar; 100 Nm
Upper connection into the control arm; 40 Nm + 1/4 turn
Rear Sub Frame; Large Bolt 110 Nm + 1/4 turn small bolts; 23 Nm
2015 Porsche Macan S
2021 VW Atlas SEL Premium 4-Motion
1972 VW Kombi 9 Passenger Deluxe w/ 2.0L F.I. VWAC
1965 VW Beetle
FAQ | Forum rules
-
padroB5
- Euro Addict!!!

- Posts: 1376
- Joined: Jul Sat 18, 2009 6:18 pm
- Vehicles: 00Passat2.8.toy
05 silvarado1500 - Location: Great Falls Montana
- Contact:
Re: Audi Atlas A4 Avant
put some more add ons lol sweet!!
My wagon ant fast just gets Groceries fast.....
WAGONS NEED LOVE TOOOOOOOO!!!!!(quoted the wife)
VW,
Yes it is Fast,
NO, you can't Drive it!
WAGONS NEED LOVE TOOOOOOOO!!!!!(quoted the wife)
VW,
Yes it is Fast,
NO, you can't Drive it!
-
Mikewire
- Site Admin
- Posts: 4090
- Joined: Oct Thu 20, 2005 1:23 am
- Vehicles: Air and Water
- Location: San Antonio, TX
- Contact:
Re: Audi Atlas A4 Avant
Cam tensioner replacement. I'll do a quick write up and then finish it up later.
Disclaimer - this is my work, follow it as a guide. I take no responsibility for any work outside of my own, so don't screw it up and blame me. Use and follow a Bentley manual and use the proper tools for the job.
The code I was getting:
16396 - Bank 1: Camshaft A (Intake): Advance Setpoint not Reached (Over-Retarded)
P0012 - 001 - Upper Limit Exceeded - Intermittent
Got all my parts from Europa Parts, I'll scrape up the tensioner part #.
You will need cam tensioner tool 3366.
Very helpful to know these torque values:
Bearing caps to cylinder head: 10nm
Camshaft adjuster to cylinder head: 10nm
Camshaft position sensor rotor ring to camshaft: 25nm
Camshaft position sensor housing to cylinder head: 10nm
Camshaft sprocket to camshaft: 65nm
~~~~~~~~~~~~~~~~~~~~~~~~~~~~~~~~~~~~~~~~~~~~~~~~~~~~~~~~~~~~~~~~~~~~~~~~~
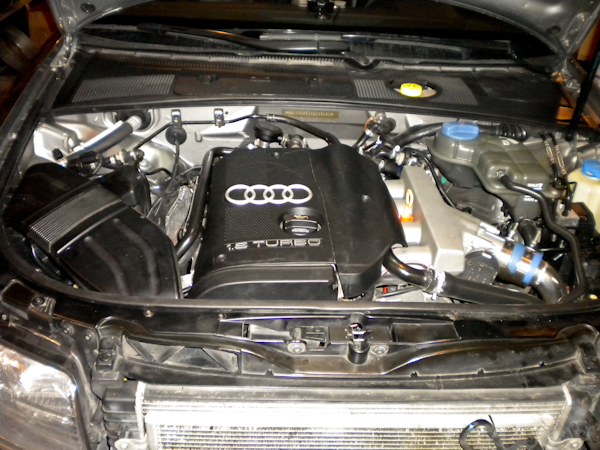
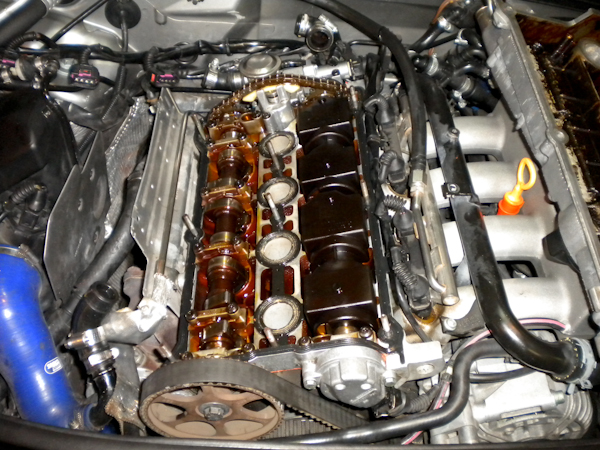
Disconnect the battery and remove the snorkel, SAI and various hard lines. Pull the spark plugs and cover or pulg the spark plug holes so nothing ends up in the cylinder(s):
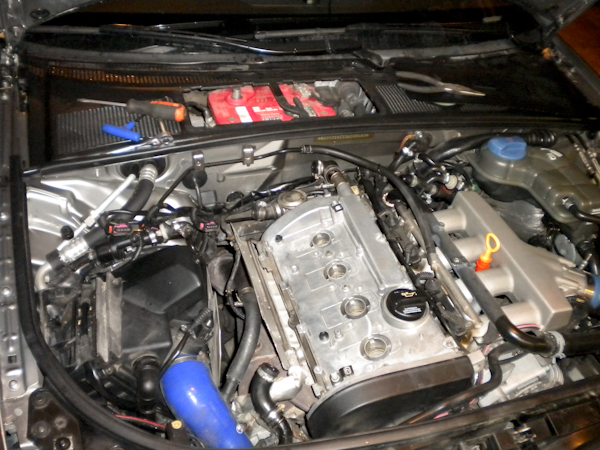
Remove the 9 10mm nuts and remove the valve cover:
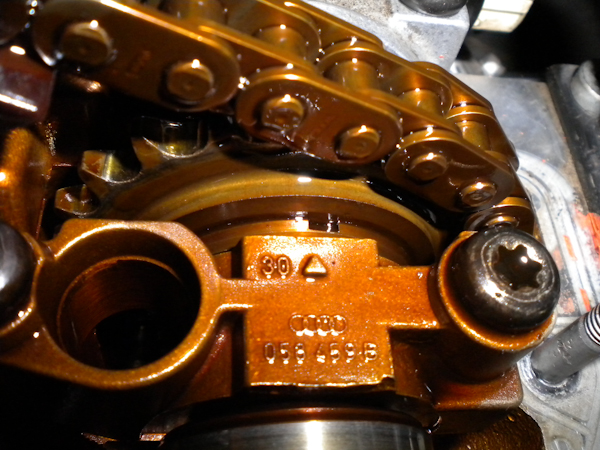
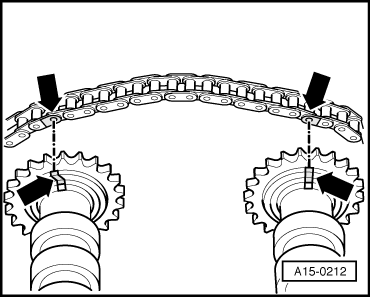
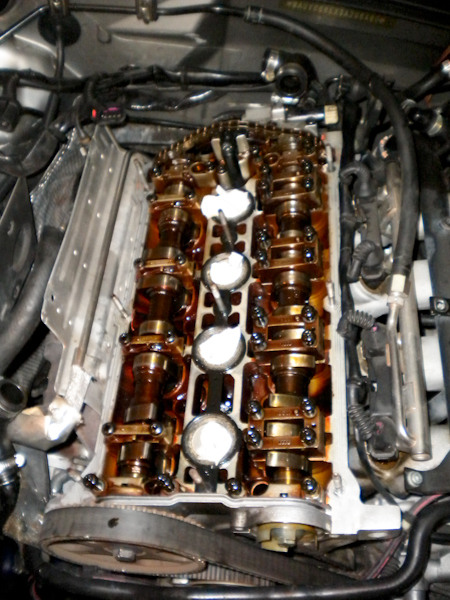
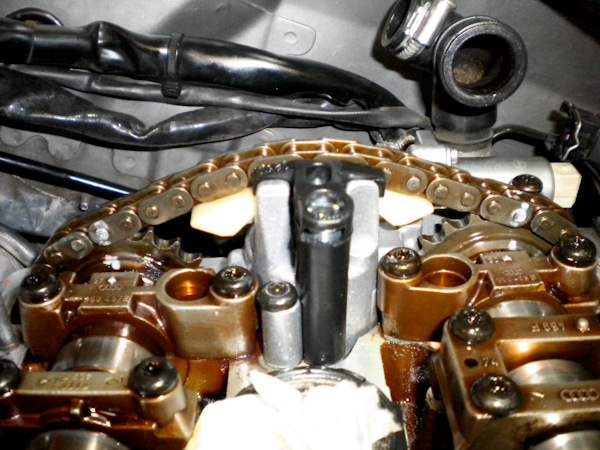
Remove the front timing cover and use a 17mm socket to rotate (clockwise) the motor to TDC, noted by the notch on the exhaust and intake cams aligning with the arrows on the top of the cam caps:

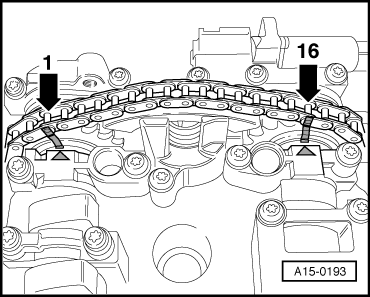
Count 16 pins in the chain (including the pins above the TDC points) and mark the points - this will keep your cam timing and give reference marks when installing the new tensioner:
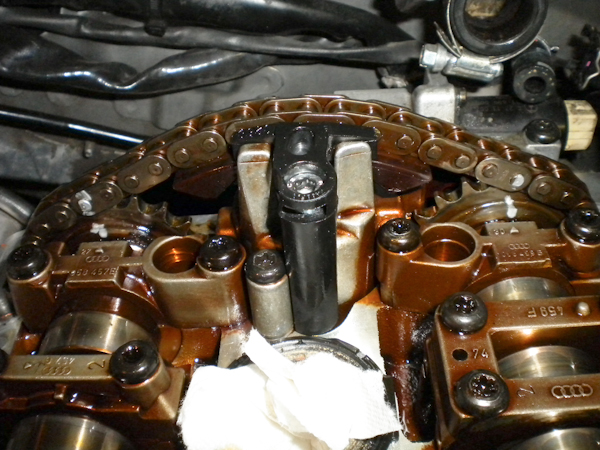
Prepare to remove the intake cam - Install the tensioner tool, and carefully and slowly tighten it to pull the tensioner 'pads' inward. Then remove the camshaft position sensor at the front of the motor - 2 10mm bolts.
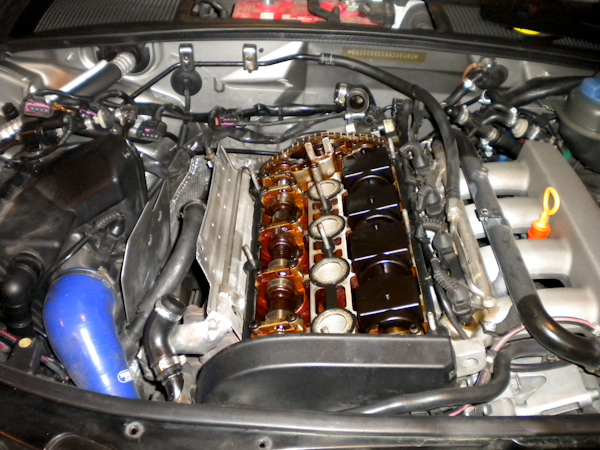
Now it's time to loosen and remove the cam caps - be sure to keep these in order as you remove them! Remove the cam cap bolts, in a diagonal 'criss cross' pattern (on each cap) starting with cap #2, #4, then #3. Then remove the bolts for the #1 and finally the #5 cam seal cover.
Set these parts aside in specific order.
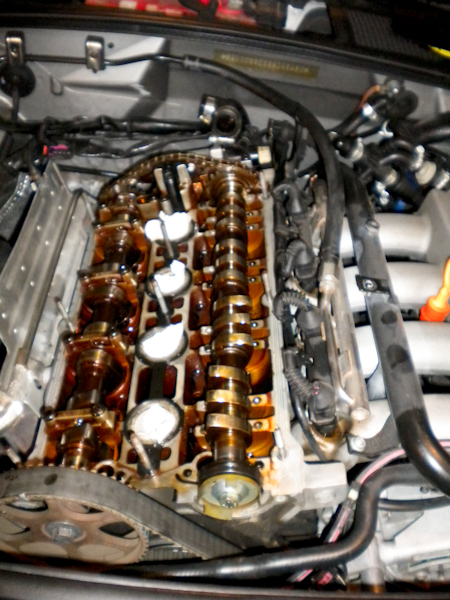
It's possible to remove the tensioner and the cam, it's tough, but it can be done. It helps to loosen the combi valve at the back of the head and remove it, or just move it a bit out of the way, otherwise the tensioner will bump against the top of the valve and it will be much harder to remove and install the new tensioner.
With that said, slowly work the cam tensioner and cam up and out and set them aside.
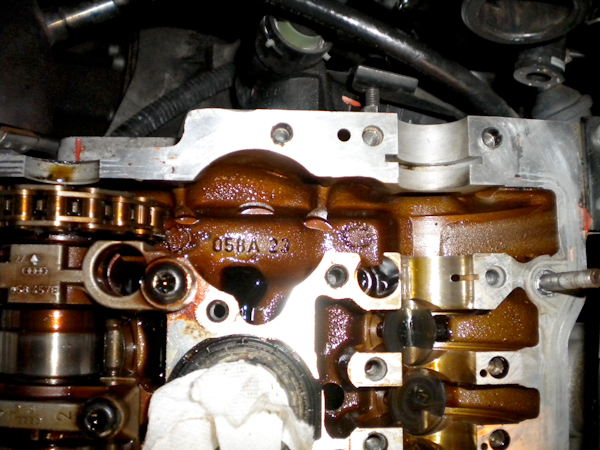
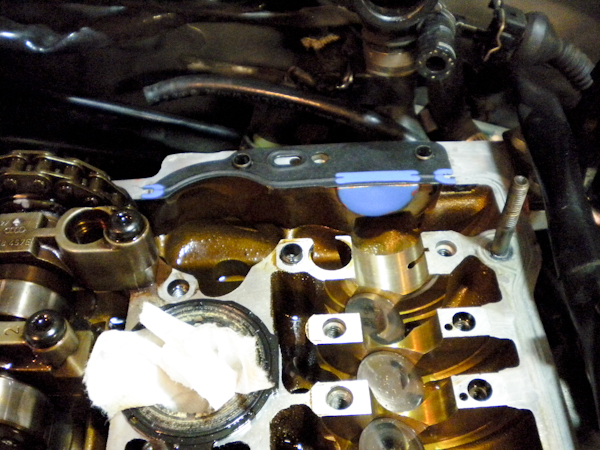
With the tensioner and cam removed, clean up the sealing surfaces and prep them for the new seals and a bit of sealant:
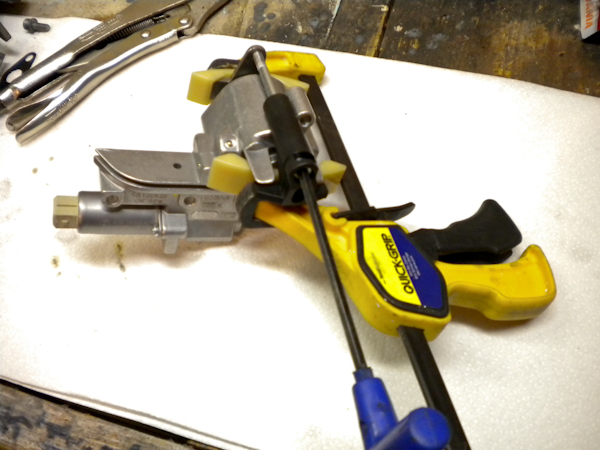
Install the tensioner tool in the new tensioner and prep it for install:
Install the new tensioner seal and half moon gasket - I used a small amount of high temp sealant, optional:

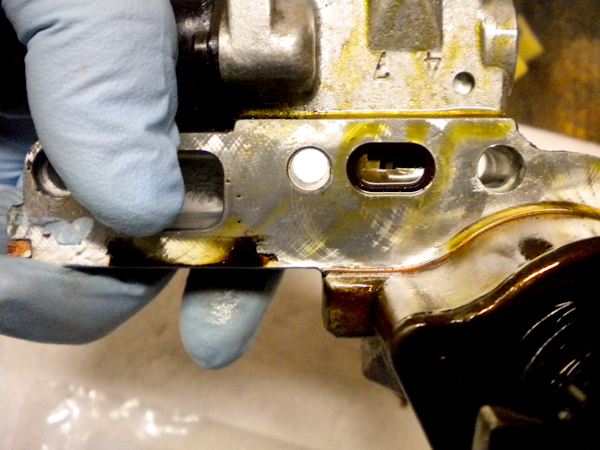
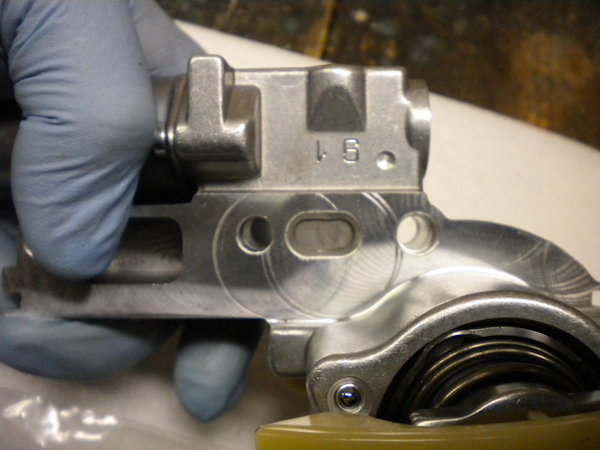
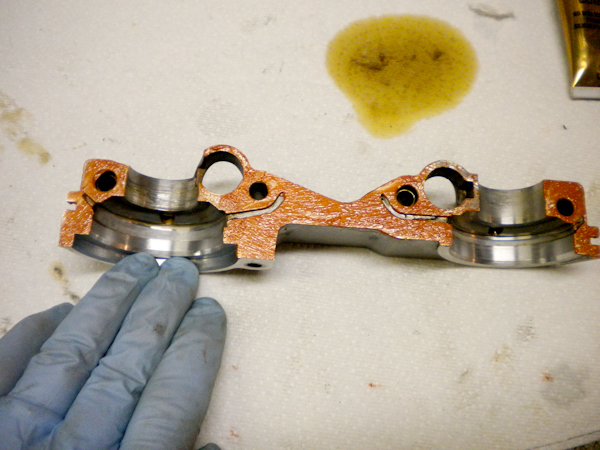
Just a bit of comparison, and I can see why my tensioner may have failed. On the high pressure oil port, there is a small screen filter - on the old tensioner, you can see half of the screen material is missing. I can only presume it just pushed up into the oil passages of the tensioner and is causing oil restriction. Not a huge deal, but the fact that I was getting chatter on startup and a code for the tensioner, it's probably caused by this screen filter failure.
Little skim coat of high temp sealant on the cam seal cap:
Time to install the tensioner - again, go slow, line up the timing marks making sure to have the 16 links between the TDC marks on the cam, lining up the marks on the cam and chain from earlier.
Install the cam caps back in order #2, #4, #5, #3, #1, and slowly torque the cap bolts in a diagonal pattern until they are all tight to 10nm. Don't forget to remove the cam chain tensioner tool!
Rotate the motor over a couple of revolutions and back to TDC to verify your cam timing and those 16 links in the chain. Double, triple and quadruple check your timing!!
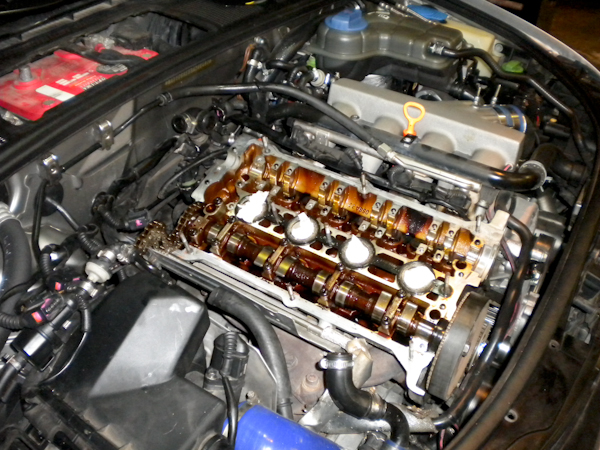
With timing fully checked and verified, reinstall the intake cam covers, (combi valve if removed) and valve cover. Then all the various SAI pipes and hardlines.
Start it up and if you did the job correctly, it should fire up and idle smooth as butter.

Disclaimer - this is my work, follow it as a guide. I take no responsibility for any work outside of my own, so don't screw it up and blame me. Use and follow a Bentley manual and use the proper tools for the job.
The code I was getting:
16396 - Bank 1: Camshaft A (Intake): Advance Setpoint not Reached (Over-Retarded)
P0012 - 001 - Upper Limit Exceeded - Intermittent
Got all my parts from Europa Parts, I'll scrape up the tensioner part #.
You will need cam tensioner tool 3366.
Very helpful to know these torque values:
Bearing caps to cylinder head: 10nm
Camshaft adjuster to cylinder head: 10nm
Camshaft position sensor rotor ring to camshaft: 25nm
Camshaft position sensor housing to cylinder head: 10nm
Camshaft sprocket to camshaft: 65nm
~~~~~~~~~~~~~~~~~~~~~~~~~~~~~~~~~~~~~~~~~~~~~~~~~~~~~~~~~~~~~~~~~~~~~~~~~
Disconnect the battery and remove the snorkel, SAI and various hard lines. Pull the spark plugs and cover or pulg the spark plug holes so nothing ends up in the cylinder(s):
Remove the 9 10mm nuts and remove the valve cover:
Remove the front timing cover and use a 17mm socket to rotate (clockwise) the motor to TDC, noted by the notch on the exhaust and intake cams aligning with the arrows on the top of the cam caps:
Count 16 pins in the chain (including the pins above the TDC points) and mark the points - this will keep your cam timing and give reference marks when installing the new tensioner:
Prepare to remove the intake cam - Install the tensioner tool, and carefully and slowly tighten it to pull the tensioner 'pads' inward. Then remove the camshaft position sensor at the front of the motor - 2 10mm bolts.
Now it's time to loosen and remove the cam caps - be sure to keep these in order as you remove them! Remove the cam cap bolts, in a diagonal 'criss cross' pattern (on each cap) starting with cap #2, #4, then #3. Then remove the bolts for the #1 and finally the #5 cam seal cover.
Set these parts aside in specific order.
It's possible to remove the tensioner and the cam, it's tough, but it can be done. It helps to loosen the combi valve at the back of the head and remove it, or just move it a bit out of the way, otherwise the tensioner will bump against the top of the valve and it will be much harder to remove and install the new tensioner.
With that said, slowly work the cam tensioner and cam up and out and set them aside.
With the tensioner and cam removed, clean up the sealing surfaces and prep them for the new seals and a bit of sealant:
Install the tensioner tool in the new tensioner and prep it for install:
Install the new tensioner seal and half moon gasket - I used a small amount of high temp sealant, optional:
Just a bit of comparison, and I can see why my tensioner may have failed. On the high pressure oil port, there is a small screen filter - on the old tensioner, you can see half of the screen material is missing. I can only presume it just pushed up into the oil passages of the tensioner and is causing oil restriction. Not a huge deal, but the fact that I was getting chatter on startup and a code for the tensioner, it's probably caused by this screen filter failure.
Little skim coat of high temp sealant on the cam seal cap:
Time to install the tensioner - again, go slow, line up the timing marks making sure to have the 16 links between the TDC marks on the cam, lining up the marks on the cam and chain from earlier.
Install the cam caps back in order #2, #4, #5, #3, #1, and slowly torque the cap bolts in a diagonal pattern until they are all tight to 10nm. Don't forget to remove the cam chain tensioner tool!
Rotate the motor over a couple of revolutions and back to TDC to verify your cam timing and those 16 links in the chain. Double, triple and quadruple check your timing!!
With timing fully checked and verified, reinstall the intake cam covers, (combi valve if removed) and valve cover. Then all the various SAI pipes and hardlines.
Start it up and if you did the job correctly, it should fire up and idle smooth as butter.
2015 Porsche Macan S
2021 VW Atlas SEL Premium 4-Motion
1972 VW Kombi 9 Passenger Deluxe w/ 2.0L F.I. VWAC
1965 VW Beetle
FAQ | Forum rules

-
Mikewire
- Site Admin
- Posts: 4090
- Joined: Oct Thu 20, 2005 1:23 am
- Vehicles: Air and Water
- Location: San Antonio, TX
- Contact:
Re: Audi Atlas A4 Avant
I'm sick of my CEL for the incorrect flow from my SAI, and there's no Revo dealer in MT anymore. (Mkay...)
So I called 3Zero3 Motorsports in Denver about updating my Revo stage 2 with a SAI/CEL delete. Waiting on a reply.
I so need to open a Euro tuner friendly shop in Billings. Who's got startup cash lol?
So I called 3Zero3 Motorsports in Denver about updating my Revo stage 2 with a SAI/CEL delete. Waiting on a reply.
I so need to open a Euro tuner friendly shop in Billings. Who's got startup cash lol?
2015 Porsche Macan S
2021 VW Atlas SEL Premium 4-Motion
1972 VW Kombi 9 Passenger Deluxe w/ 2.0L F.I. VWAC
1965 VW Beetle
FAQ | Forum rules
-
MT-Getto

- Euro Addict!!!
- Posts: 2747
- Joined: Dec Sun 17, 2006 11:46 am
- Vehicles: 20VTMK2GLI
MK6DSGGTI
2010PowerStroke - Location: Fraggle Rock
Re: Audi Atlas A4 Avant
"Tuned" its gonna be called. I've got the spot but no money. Gonna have a 40' spinning lighted sign with flames shooting out the sides visible from I90.
It's not how fast you go. It's how well you go fast.
-
Mikewire
- Site Admin
- Posts: 4090
- Joined: Oct Thu 20, 2005 1:23 am
- Vehicles: Air and Water
- Location: San Antonio, TX
- Contact:
Re: Audi Atlas A4 Avant
^ Mikey like. Maybe we could make a Discovery channel reality show 
2015 Porsche Macan S
2021 VW Atlas SEL Premium 4-Motion
1972 VW Kombi 9 Passenger Deluxe w/ 2.0L F.I. VWAC
1965 VW Beetle
FAQ | Forum rules
-
Mikewire
- Site Admin
- Posts: 4090
- Joined: Oct Thu 20, 2005 1:23 am
- Vehicles: Air and Water
- Location: San Antonio, TX
- Contact:
Re: Audi Atlas A4 Avant
No dice from Revo, lame.
I will just dump, edit and load my own flash then.
MPPS is in the mail.
Edit, I'm going to build a bench flash setup.
Ebay shopping comes up with a few items, but people are wanting too much for some plastic and copper.
Looking for an OBD2 connector and harness, could be VW or Audi anything OBD2
Looking for an Audi B6 (A4 or S4) ECU connector and harness.
It would also be nice to find an extra ECU to play with, if anyone knows about any Audi ECU's laying about.
Thanks guys, any support you have would be appreciated, and I will share the knowledge I discover.
2015 Porsche Macan S
2021 VW Atlas SEL Premium 4-Motion
1972 VW Kombi 9 Passenger Deluxe w/ 2.0L F.I. VWAC
1965 VW Beetle
FAQ | Forum rules
-
YASHA7FOLD

- Euro Addict!!!
- Posts: 2092
- Joined: Jun Wed 30, 2010 4:42 pm
- Vehicles: 58 Buggy,65 Baja,69 Beetle, 72 Westy
- Location: Laurel
- Contact:
Re: Audi Atlas A4 Avant
Well poo on revo. You going to be home around 7ish?
Sent from my iPhone using Tapatalk
Sent from my iPhone using Tapatalk
.R13 5 (o\!/o)
..╚╬╬╝
... 24
..╚╬╬╝
... 24
