1972 Type 1
Moderators: Mikewire, Rennwagen1
-
YASHA7FOLD

- Euro Addict!!!

- Posts: 2092
- Joined: Jun Wed 30, 2010 4:42 pm
- Vehicles: 58 Buggy,65 Baja,69 Beetle, 72 Westy
- Location: Laurel
- Contact:
Re: 1972 Type 1
You can get a new empi carb. It's the solex with the empi stamp for $150
.R13 5 (o\!/o)
..╚╬╬╝
... 24
..╚╬╬╝
... 24
-
SweaterVest

- In the drivers seat...

- Posts: 607
- Joined: May Wed 20, 2009 7:35 pm
- Vehicles: 97' VW GTI VR6
dune buggy
91' VW GTI 8v
Re: 1972 Type 1
That inside the tank picture is pretty rad. Man that has got to be the shiniest beetle gas tank I have ever seen!
-
kevin286
- In the trunk...

- Posts: 337
- Joined: Jul Sat 05, 2008 10:23 am
- Vehicles: 02 M3, 06 Taco DCSB, 90 240 Wagon
- Location: Moab, UT
- Contact:
Re: 1972 Type 1
@YASHA7FOLD
Gotta be careful with some of the new carbs, it's my understanding some of these are of sub-par quality and/or do not last long (no throttle shaft bushings).
I don't have any personal experience with them, just getting my info off of The Samba. That said, using a new carb of *hopefully* good quality at 150 vs a known quality carb rebuilt to OEM standards for a couple of Jacksons more... I'm gonna go with the OEM route. + bonus, I get to keep it closer to production line stock which is important to me in this build.

@SweaterVest
Thanks, I learned a lot about painting. Hope to put that knowledge to use in a larger scale in the future
Gotta be careful with some of the new carbs, it's my understanding some of these are of sub-par quality and/or do not last long (no throttle shaft bushings).
I don't have any personal experience with them, just getting my info off of The Samba. That said, using a new carb of *hopefully* good quality at 150 vs a known quality carb rebuilt to OEM standards for a couple of Jacksons more... I'm gonna go with the OEM route. + bonus, I get to keep it closer to production line stock which is important to me in this build.
@SweaterVest
Thanks, I learned a lot about painting. Hope to put that knowledge to use in a larger scale in the future
-
kevin286
- In the trunk...
- Posts: 337
- Joined: Jul Sat 05, 2008 10:23 am
- Vehicles: 02 M3, 06 Taco DCSB, 90 240 Wagon
- Location: Moab, UT
- Contact:
Re: 1972 Type 1
having removed, cleaned, tweaked, reinstalled, removed, cleaned, puttered, dinkered, fussed, removed, installed, tested, probed, prodded and cursed at this carb more than I care to admit I have found what I hope to be my problem.
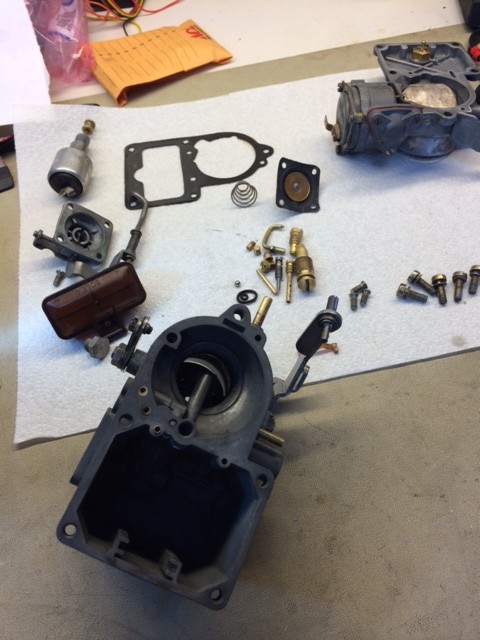
If my guess is correct, cleaning the carb actually created the problem.
I have determined through the use of mapp gas that my throttle shafts are leaking air from both sides.
I'm thinking that cleaning the carb removed the built up varnish that was sealing these.
So yanked it AGAIN
pulled the shaft out and got the bushings out.
Searching the internet results in VERY few helpful results. Most say "send it off for a rebuild" or "buy a rebuilt" or "buy a brosel" or some other BS which is code for "i'm not creative enough to fix this, lets either give up or make it someone else's problem" … okay, that's just me projecting, don't take offense. (where's the mr green middle finger smilies from pirate4x4???
So I did find ONE result of someone in the United Kingdom selling replacement brass bushings. About 18 bucks to ma door. So done and done. http://www.ebay.com/itm/271630400278 I did try to find bushings from the usual internet searches and mcmaster carr but no one seemed to have the correct dimensions. They mic out at 7.95 9.68OD or there a bouts. Meh…. Going to Zion, when I get back I'll try these bad boys out.
xing fingers here
Last edited by kevin286 on Jul Mon 01, 2019 9:08 pm, edited 1 time in total.
-
YASHA7FOLD
- Euro Addict!!!
- Posts: 2092
- Joined: Jun Wed 30, 2010 4:42 pm
- Vehicles: 58 Buggy,65 Baja,69 Beetle, 72 Westy
- Location: Laurel
- Contact:
-
kevin286
- In the trunk...
- Posts: 337
- Joined: Jul Sat 05, 2008 10:23 am
- Vehicles: 02 M3, 06 Taco DCSB, 90 240 Wagon
- Location: Moab, UT
- Contact:
Re: 1972 Type 1
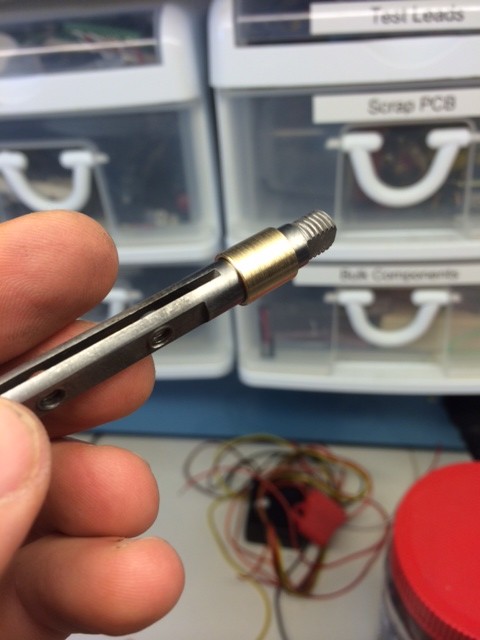
It says Royal Mail so it must be good
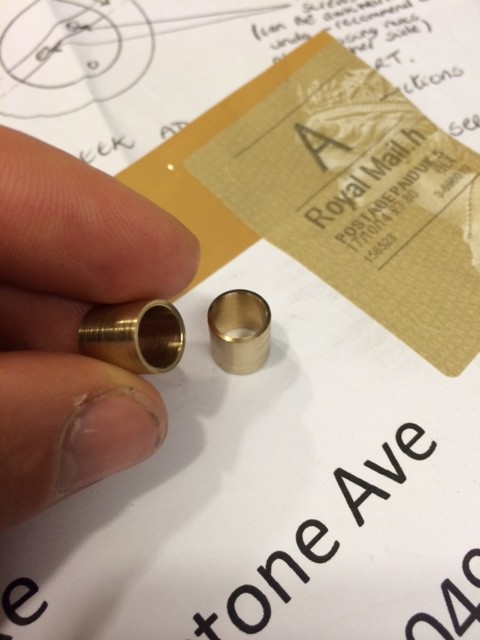
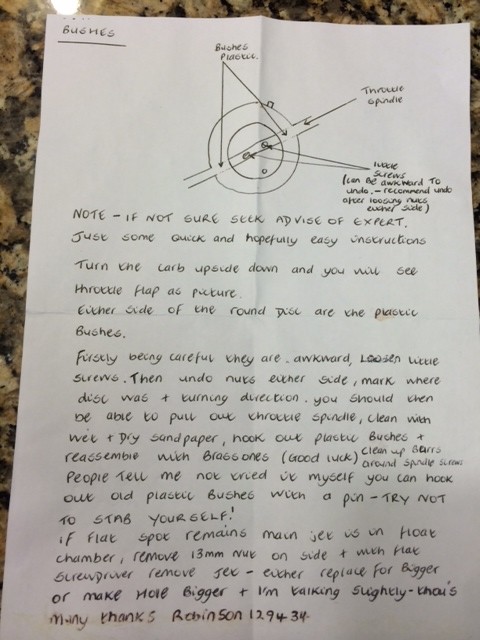
Comes with instructions
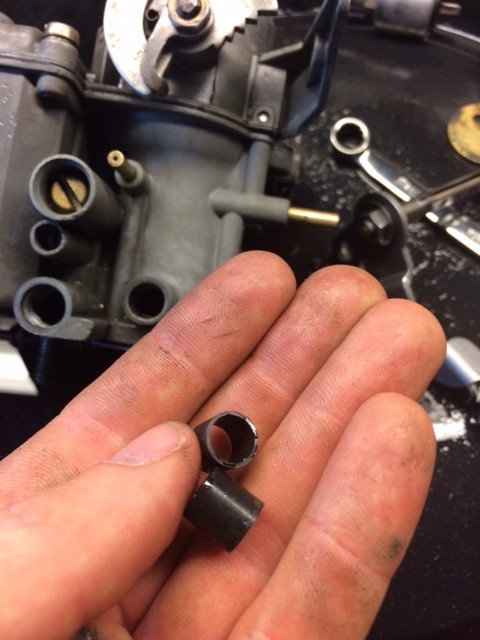
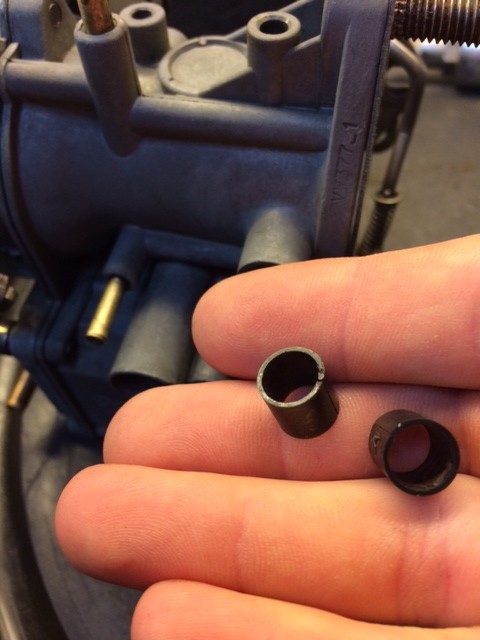
These are the old bushings. They are plastic
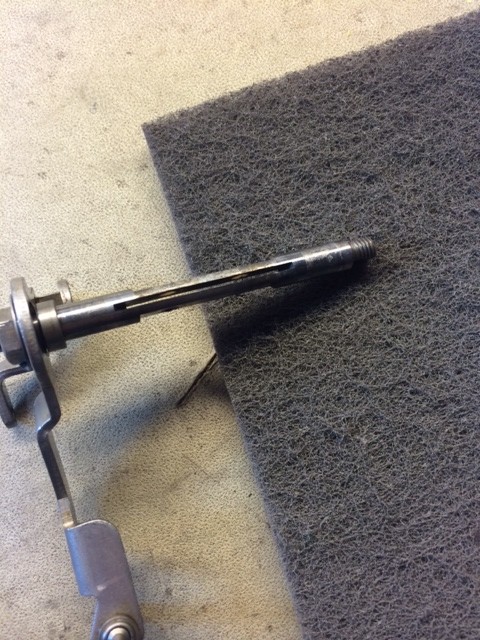
Best to clean the throttle shaft because these are a precision fit
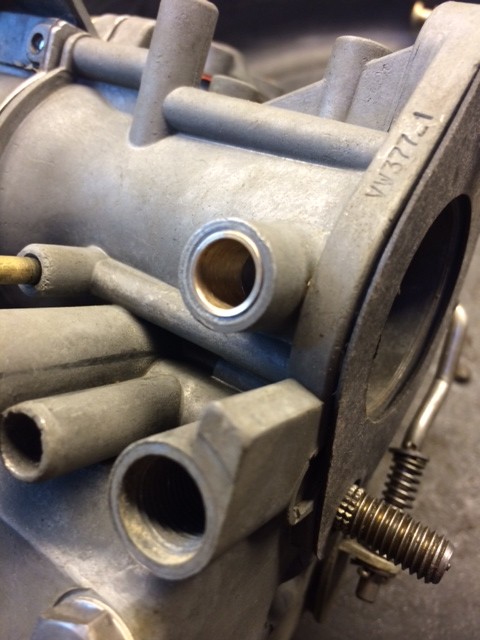
All better
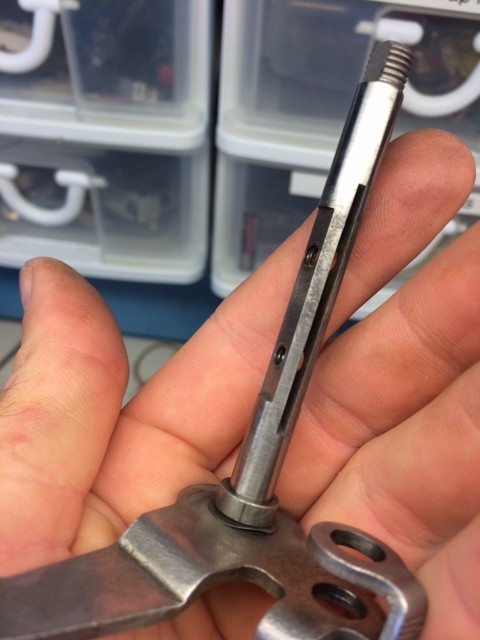
Test fit. Nice and smooth
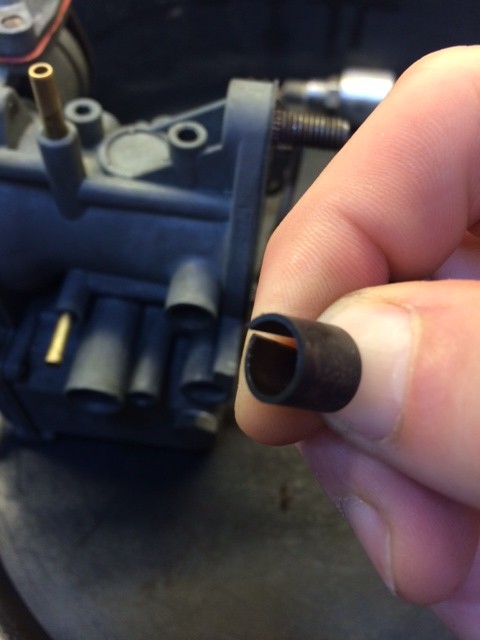
Test fit in the carburetor
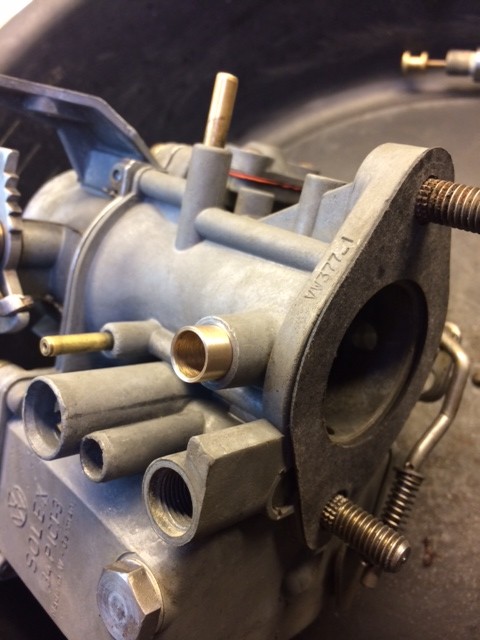
Looks and feels good so pushed it. I put a tiny drop of blue locktight on the carb hole before pushing the bushings in the final bit. Not sure if that's really needed but whatever. It's not epoxy or anything so I should still be able to get these out if needed.

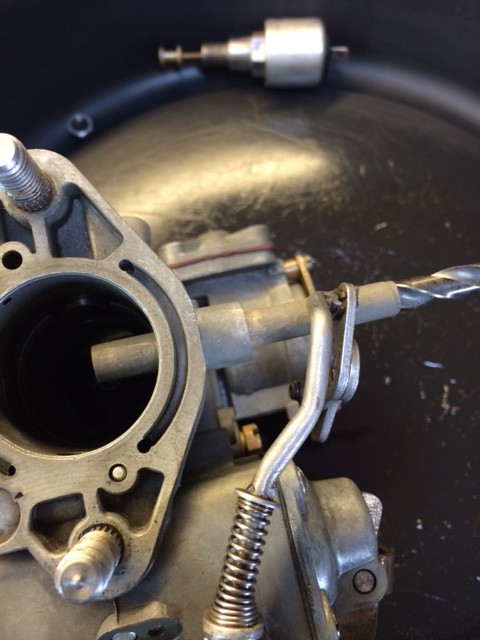
With the bushings in, the throttle shaft was a tad snug so some fine sizing with 1000 grit. Just a touch at a time until I had smooth free movement.
Comes with instructions
These are the old bushings. They are plastic
Best to clean the throttle shaft because these are a precision fit
All better
Test fit. Nice and smooth
Test fit in the carburetor
Looks and feels good so pushed it. I put a tiny drop of blue locktight on the carb hole before pushing the bushings in the final bit. Not sure if that's really needed but whatever. It's not epoxy or anything so I should still be able to get these out if needed.
With the bushings in, the throttle shaft was a tad snug so some fine sizing with 1000 grit. Just a touch at a time until I had smooth free movement.
Last edited by kevin286 on Jul Mon 01, 2019 9:11 pm, edited 1 time in total.

Re: 1972 Type 1
I hope that works!! keep us posted, i want to hear that engine run smooth!
-Fukengruven
92 S4
91 Golf VR6
92 S4
91 Golf VR6
-
kevin286
- In the trunk...
- Posts: 337
- Joined: Jul Sat 05, 2008 10:23 am
- Vehicles: 02 M3, 06 Taco DCSB, 90 240 Wagon
- Location: Moab, UT
- Contact:
Re: 1972 Type 1
Me too man!
-
serenityfab

- n00b...

- Posts: 5
- Joined: Jan Mon 13, 2014 2:21 pm
- Vehicles: 63 Ragtop bug
67 Squareback survivor - Location: Bozeman, MT
Re: 1972 Type 1
Any progress? Did you get it back together and working? I had a 72 Bay with dual carbs I had the same problem. I eventually went with a new solex setup from Aircooled.com. Worked great until I drove on the street and found out I have a flat camshaft lobe. I sold it and have regretted it ever since. I did use the money though and got lucky and found my 63 Rag (which cost me more than the engine rebuild would have!)
Good Luck.
Good Luck.
67 Squareback Survivor
63 Ragtop Baja
Plasmacam CNC plasma cutter
"Be miserable. Or motivate yourself. Whatever has to be done, it's always your choice."
So get in the garage and build!
63 Ragtop Baja
Plasmacam CNC plasma cutter
"Be miserable. Or motivate yourself. Whatever has to be done, it's always your choice."
So get in the garage and build!
-
kevin286
- In the trunk...
- Posts: 337
- Joined: Jul Sat 05, 2008 10:23 am
- Vehicles: 02 M3, 06 Taco DCSB, 90 240 Wagon
- Location: Moab, UT
- Contact:
Re: 1972 Type 1
@serenity yea I got it put back together. Thought it was pretty good so went and filled it up at the gas station. Next day went to drive it and it was hydrolocked. Darn new float valve must be shit. F'n empi. Pulled the fuel line off and plugged it.
Later hooked the fuel back up and drove to Phoenix to pick up a taco and towed it back. It's at half tank and not leaking now. Not sure if it fixed itself or if just at half tank there's no gravity/head pressure on the float valve.
Idle is petty good, still higher than I'd like IIRC but I'm settling on smooth until i get more patience to mess with it.
The bushings for sure helped though and at 20$ it's a great 'why not' item to do if your tshaft bushes are leaking.
